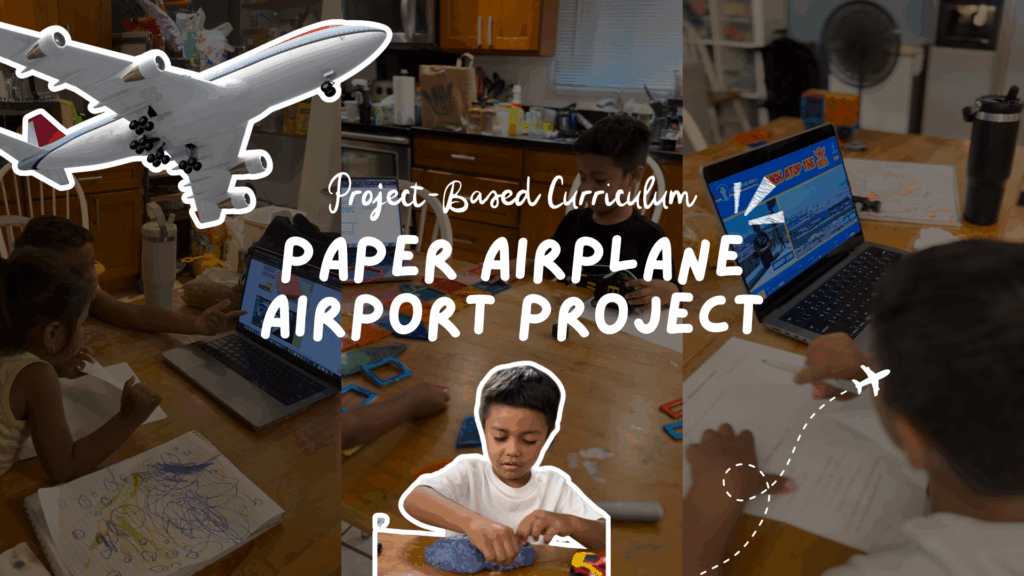
When I first thought up the Paper Airplane Airport project, I imagined it would be a fun little way to fold some planes and sneak in a bit of science. But the week unfolded into so much more — giggles, improvising, proud mom moments, and learning tucked into every corner.
To give you a real picture of how it worked, I’m sharing the original outline by day alongside my actual journal entries. Think of it as “the plan” vs. “real life.”
Day 1 – Introduction & Inspiration
Outline Plan:
- Meet the mentor (in person or via video) and learn about airports
- Watch a short kid-friendly video on how airplanes fly
- Observe planes at an airport or via a live webcam
- Activity: Draw one thing you learned or saw
Our Journal:
Today was the very first day of our airport project, and it felt like such a fun kickoff. We started the morning talking about what makes airports exciting. The kids threw out answers like “airplanes everywhere!” and “going on trips,” and then we dove into labeling a simple diagram — runway, control tower, terminals, gates.
We watched a short video on how airplanes fly. Every few minutes I’d pause and ask, “So what makes a plane go up?” or “What helps it move forward?” and they’d flap their arms wildly or hold their hands up against the “air.” Lots of giggling mixed in with some pretty solid answers.
Since we’re too far from an actual airport, we watched a live webcam of LAX. Honestly, it was perfect. They counted planes, noticed the colors and shapes, and even compared what the airport looked like at different times of day.
We ended with drawings. My oldest proudly told me, “Airports have control towers so the pilots know what to do.” My youngest? “I saw a big red plane!” And that was just as perfect.
By bedtime, the living room was buried in paper planes and crayons. Messy, chaotic… but it felt like the best start to the week.
Day 2 – Airport Planning & Design
Outline Plan:
- Sketch airport layout: runways, gates, control tower
- Learn about map views (top-down)
- Activity: Measure and mark a runway with tape/chalk
- Number the gates and create a map key
Our Journal:
Today’s lesson was all about airports — how they’re laid out and why each part matters. My plan was to mark out a runway on the floor with tape or chalk. Except… we had neither. So, homeschooling improvisation to the rescue.
We started with Magna-Tiles, but they toppled every time we tried to add more. Finally, we pushed the dining table aside and used sticks. Suddenly the whole runway and taxiway layout clicked into place.
One of my favorite moments was watching James with the measuring tape. He picked it up like he’d been doing it forever and even figured out how to convert our little “100 ft = 10 ft” scale on his own. Honestly, I thought it would go over his head, but nope — he nailed it.
Later, he sketched his own airport, numbering gates, inventing symbols (✈️ for airplanes, 🗼 for the tower), and proudly adding them to a little key. We wrapped up by choosing flight destinations on a world map — some real, some completely made up (“Unicorn Island” was a favorite).
It definitely wasn’t the exact day I planned, but the pivots made it even more hands-on. Sometimes the detours really are the best part of homeschooling.
Day 3 – Plane Building & Testing
Outline Plan:
- Learn 3–5 paper airplane folds (dart, glider, stunt plane)
- Test flights
- Record and compare results
- Activity: Chart distances
Our Journal:
Today was paper airplane day, which means it was equal parts chaos and belly laughs. Since the kids are still little, I became the “head engineer,” and they proudly took on the role of “crease makers.” They pressed down each fold with serious determination, like it was their job to keep NASA running.
We tried a few different plane styles — darts for speed, gliders for distance, and a stunt plane that was supposed to loop. (Ours mostly just flopped sideways, which caused so much laughter.)
Instead of measuring in feet, we decided to count steps. Best decision ever. Each launch turned into a half-run, half-march down the “runway,” sometimes with an extra hop at the end just for fun.
We did a few trials, counted steps, compared which ones went farthest, and debated which plane was “best.” Between all the running, counting, and problem-solving, they were basically doing science and math without realizing it.
By the end, our “runway” was littered with crumpled paper, the results chart had more doodles than numbers, and the kids were still buzzing about whose plane had “won.” That’s my kind of school day.
Day 4 – Airport Details, Tickets & Mentorship
Outline Plan:
- Meet a mentor (pilot, engineer, or airport worker) OR watch a video about airport operations
- Decorate gates
- Create tickets with passenger names, destinations, and gate numbers
Our Journal:
Today felt like the kind of homeschool day I dream about. We technically worked on gates and tickets, but the best part was circling back to Lesson 1’s “mentor” piece. Uncle Dylan (a civil engineer) joined us over Zoom, and wow — he made everything come alive.
He explained how runways work, why some airports need more than one, what the numbers and letters mean, and even how wind direction plays into takeoffs. I was learning right alongside the kids, and I loved it.
After that, we decorated our gates. Gate 3 (according to my youngest) needed rainbow lights and puppies. Then came the ticket making. The kids carefully wrote their names, picked destinations (Tokyo, Disneyland, Unicorn Island), and matched them with gate numbers. My oldest even drew a QR code on his because, as he said, “tickets need those, Mom.”
And the best part? They wrote without complaining. They wanted those tickets to look real. That’s a homeschool win if I’ve ever seen one.
Day 5 – Grand Opening & Presentation
Outline Plan:
- Set up the full airport
- Present the airport to family/friends
- Launch ceremony: flights take off from each gate
- Celebrate with “in-flight snacks”
Our Journal:
Today was the grand opening of our Paper Airplane Airport, and honestly? I got a little teary seeing it all come together.
The kids hustled all morning — runway marked, gates decorated, planes lined up, ticket booth ready. They even made intercom announcements: “Attention passengers, Flight 102 is now boarding at Gate 3!” It was the cutest thing ever.
James proudly gave us the grand tour, walking us through his airport, sharing facts he learned earlier in the week, and handing out tickets like a pro. Then came the “flight launch ceremony.” Stuffed animals lined up, passengers boarded, and the planes soared (or flopped) while we all cheered.
We wrapped it up with in-flight snacks (pretzels + juice boxes), and I sat there soaking it in. In one week, we’d touched math, science, writing, geography, art, problem-solving, and public speaking. But what really stood out was the confidence in my son’s face as he explained his airport.
It was loud, messy, and completely imperfect — but I’d choose this kind of homeschool chaos every time.
Want to Try It Too?
I pulled our Paper Airplane Airport Outline into a printable, open-and-go guide so you can do this project at home without piecing it all together.
👉 Download the Lesson Outline Here: https://otherthanamom.myflodesk.com/airport-outline
Final Thoughts
The outline gave us structure. The journal moments made it ours.
Homeschooling doesn’t always look like neat lesson plans. Sometimes it looks like sticks on the floor, rainbow lights at Gate 3, and a child beaming with pride because he built his very own airport.
And honestly? That’s the school I want every day.